TL;DR
This repository contains code to turn your Kali Linux machine into a router that - records all traffic with wireshark - sends HTTP and HTTPS traffic to an intercepting proxy, such as BurpSuite, running on another machine.
Read Setup and Automation to configure your Kali Linux machine and run the scripts.
Read A Raspberry Pi Kali Router if you want to run this on a Raspberry Pi.
We assume that you own an Ethernet LAN Network USB Adapter and a wireless B/G/N USB adapter.
- TL;DR
- Introduction
- Setup
- Configuring Kali Linux as a Router
- Sniffing and Intercepting Traffic
- Automation
- Intercepting Communication from Embedded Devices, Android Apps, and Windows Applications
- A Raspberry Pi Kali Router
- Conclusion
- References
Introduction
Many of us regularly sniff or intercept traffic coming from embedded devices, mobile apps, or windows applications. For devices or applications that are proxy-aware, interception of traffic is straightforward: we configure the application or device to use our proxy, such as BurpSuite, and go on with our lives. For devices or applications that are not proxy-aware, intercepting traffic is more challenging.
In this article, we describe how to set up Kali Linux to sniff TCP/UDP traffic of any device, app, or application by configuring Kali as an intercepting router that can forward specific traffic to a transparent proxy on a different machine, such as HTTP(S) traffic to BurpSuite. Situations where an intercepting router is useful include complex scenarios where many devices and applications interact with each other, such as an embedded device that interacts with a web service, but that can also be configured via a mobile and a windows application. To maximize portability, we implement the above set-up on a Raspberry Pi.
Setup
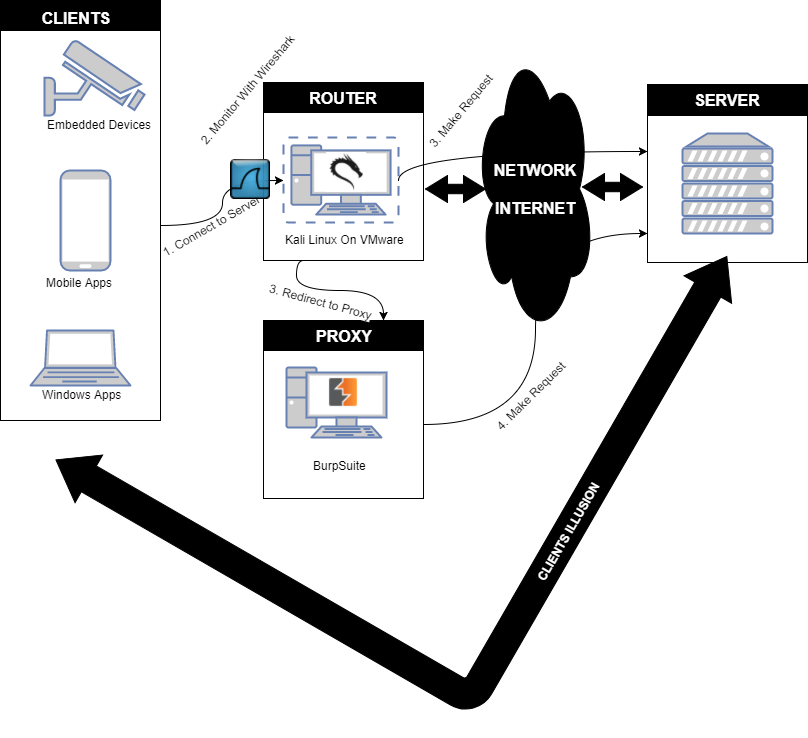
We configure Kali Linux as a proxy-aware router. Clients, such as embedded devices or mobile apps, make connections to their servers as they normally would, but interesting packets (e.g. HTTP and HTTPS packets) are intercepted by our Kali Linux machine and redirected to a proxy server (e.g. BurpSuite). All traffic passing through our router is monitored with Wireshark. Both our Kali Linux machine and BurpSuite act as a transparent proxy as the clients are not aware of their existence. The main advantage of this set-up is that it reduces the configuration of the clients to a minimum. This setup is illustrated in the figure below.
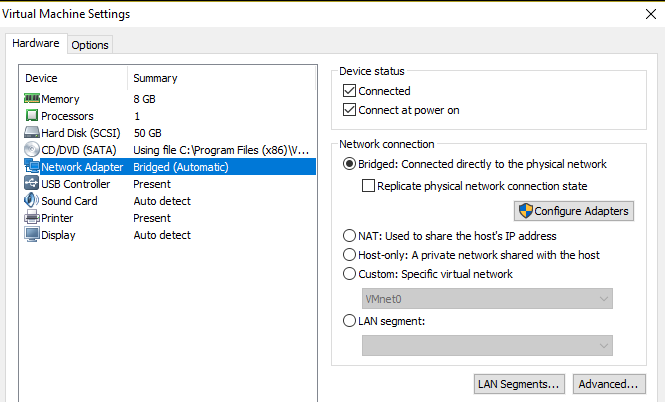
Before configuring our Kali Linux machine, we need to configure VMWare and our network interfaces as follows.
- We connect our Kali Linux machine running within VMWare to the network in bridged mode so that it is directly connected to the network the device/application/mobile phone that we want to monitor would normally connect to.
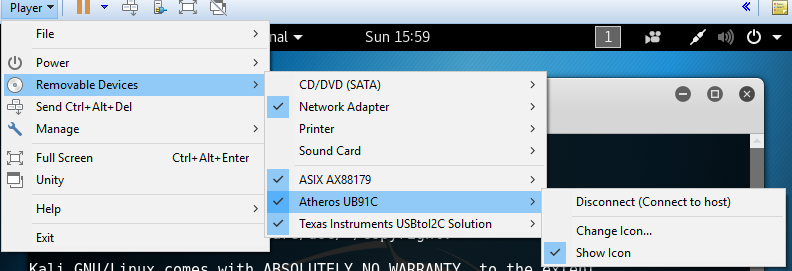
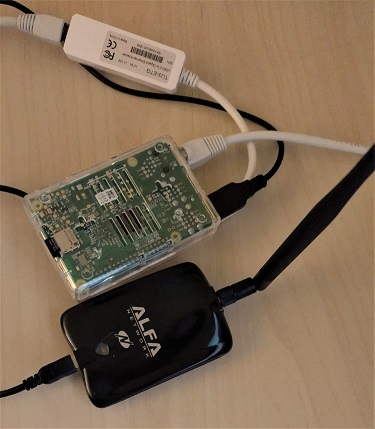
 - We connect two adapters (Ethernet and WiFi) and give the USB connections to Kali. In the figure below, our adapters are the Ethernet LAN Network Adapter ASIX AX88179 and the wireless B/G/N USB adapter Atheros UB91C. For WiFi, we could have used any adapter that is compatible with Linux, as long as it supports promiscuous mode.
The subsequent sections elaborate how we configure our Kali Linux machine as a router and how we monitor devices and applications by connecting them to the Kali Linux router.
Configuring Kali Linux as a Router
Our Kali Linux machine will route traffic from the plugged in USB network interfaces (Ethernet and WiFi) to its own Internet connection and vice versa. Creating a router consists of four main parts.
- Setting up the Ethernet layer so that wired clients can connect to Kali’s interface.
- Setting up the Wi-Fi data link layer, so that wireless clients can connect to Kali’s “software access point” and send/receive IP packets from/to Kali. We use the hostapd application to do this. We bridge both the wired interface as well as the access point so that the machines connected to them are part of the same network (so that we can monitor a multi-device set-up such as an embedded device connected via Ethernet communicating with a mobile application, a Windows application, and the Internet).
- Setting up the network configuration on our Kali Linux machine, so that it properly relays IP packets from its own Internet connection to its connected clients (and vice versa).
- Adding network services such as DNS and DHCP so that clients get assigned IP addresses and can resolve domain names. We can use the DNS network service to redirect any domain name to a machine under our control.
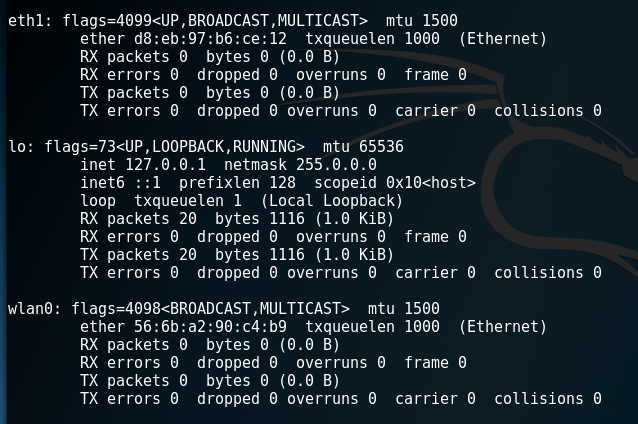
Before we execute the aforementioned steps, we will need to figure out what interfaces the adapters show up as. To do so, we execute ifconfig on our Kali Linux machine before and after we connect the adapters.
$ ifconfig -a
Our Ethernet adapter will typically show up as eth1 while our WiFi adapter will typically show up as wlan0. (eth0 is the interface that is configured by VMWare to give Kali access to the Internet).
We tell the network-manager service that we will manage the interfaces ourselves by adding the adapters MAC addresses to the unmanaged-devices section of the /etc/NetworkManager/NetworkManager.conf file.
[keyfile]
unmanaged-devices=mac:d8:eb:97:b6:ce:12;mac:56:6b:a2:90:c4:b9
We restart the networking service so that the devices become unmanaged.
$ /etc/init.d/networking restart
Ethernet
Before we create our monitoring network, we select an appropriate network and network mask. Using a different network range than the one of the network our Kali Linux machine connects to (via eth0) ensures that the IP addresses of our monitored devices do not clash with IP addresses used on the main network. We select the 172.16.0.0/12 network, as our main network interface (eth0) typically receives a 10.0.0.0/8 (corporate) or a 192.168.0.0/16 (home) network address.
As we want our wireless and wired network to be part of the same network, we create a bridge between them with the bridge-utils tool.
$ apt-get install bridge-utils
We then delete any IP address assigned to our wired interface eth1.
$ ip addr flush dev eth1
We create a bridge interface named br0.
$ brctl addbr br0
We add our wired interface eth1 to the bridge interface br0.
$ brctl addif br0 eth1
We bring the bridge interface br0 up.
$ ip link set dev br0 up
We assign it an IP address in the network that we selected. As it is a gateway for our monitored devices, we chose 172.16.0.1.
$ ip addr add 172.16.0.1/12 dev br0
Wi-Fi Data Link Layer
After configuring the Ethernet interface, we create a wireless access point with the hostapd program. We first install it with apt-get.
$ apt-get install hostapd
We then create its configuration file hostapd.conf with the following information.
# create a wireless network with this interface; change it if your wireless card is not wlan0
interface=wlan0
# change this if a different bridge interface was chosen
bridge=br0
# the name of our wireless network
ssid=Monitor-Network
# Change the passphrase to something you like
wpa_passphrase=Monitor-Network
# the driver used
driver=nl80211
auth_algs=3
# the wireless channel we listen on.
channel=7
driver=nl80211
# the mode we use (g)
hw_mode=g
# we don't log
logger_stdout=-1
logger_stdout_level=2
max_num_sta=5
rsn_pairwise=CCMP
wpa=2
wpa_key_mgmt=WPA-PSK
wpa_pairwise=TKIP CCMP
The first line is the interface that our wireless LAN will be created upon; i.e. the plugged in Wireless adapter wlan0. We configure the name of the network (ssid) and its password (wpa_passphrase). We will use this later on when we connect our devices. The nl80211 driver is the one used for the Atheros chipset. As we want our Ethernet and Wireless USB adapters to be part of the same network, we add them to the same bridge (br0). Our network is a g wireless network (hw_mode), as it is compatible with most devices that we want to monitor. All the other parameters are related to the configuration of WPA and logging. Refer to the hostapd Linux documentation for more information.
As there are some problems with the nl80211 driver, we execute the following commands to let our script use the wlan interfaces.
$ nmcli radio wifi off
$ rfkill unblock wlan
After creating the wireless interface wlan0, we bring it up.
$ ip link set dev wlan0 up
We tell the hostapd program to start the monitor network.
$ hostapd ./hostapd.conf -B
Network Configuration
After configuring our wireless and wired interfaces, we configure Kali to forward traffic to the interface that is configured by VMWare to give Kali access to the Internet (eth0). To do so, we first enable the kernel option for IP forwarding and then tell the iptables program to forward all packets to that interface.
Note: this should not be done on a real world router as it is rather insecure.
$ sysctl -w net.ipv4.ip_forward=1
$ iptables -P FORWARD ACCEPT
$ iptables -t nat -A POSTROUTING -o eth0 -j MASQUERADE
Network Services
We use dnsmasq to act as our DNS and DHCP server. We install it with apt-get install dnsmasq and we create a dnsmasq.conf file with the following information.
# listen to this interface; change it if a different bridge name was chosen
interface=br0
# give IP addresses, lease is valid for 8 hours
dhcp-range=172.16.0.10,172.31.255.254,8h
# router
dhcp-option=3,172.16.0.1
# dns server
dhcp-option=6,172.16.0.1
# upstream DNS server
server=8.8.8.8
log-queries
log-dhcp

# include addresses
address=/attacker.com/172.16.0.1
We give DHCP addresses to any request received on the bridge interface in our DHCP range (172.16.0.10-172.31.255.254) and we tell the device to connect to our Kali router (172.16.0.1) and our DNS server (dnsmasq itself reachable via the interface br0 on IP 172.16.0.1). If dnsmasq does not know the answer to a DNS query, it asks the upstream server (8.8.8.8 - google) for answers. We add addresses to the bottom of the file so that those domain names resolve to a machine under our control. We add more addresses by adding more lines and we restart the dnsmasq daemon every time we do:
$ service dnsmasq restart
Sniffing and Intercepting Traffic
As all traffic between devices on our monitor network passes via the bridge interface (br0), we can simply run wireshark on that interface to sniff the network traffic. The tshark program is the command-line equivalent of wireshark (We replace tshark with wireshark if we want a graphical user interface). We listen to traffic on the bridge interface (-i br0) and write all traffic to a file (-w ./output.pcap).
$ tshark -i br0 -w ./output.pcap -P
Typically, we also want to intercept traffic and thus require a few more iptables rules that redirect HTTP/1.1 and HTTPS traffic to our intercepting proxy (BurpSuite) rather than the actual server. For other protocols, including HTTP/1.0, refer to the second method of http://www.tldp.org/HOWTO/TransparentProxy-6.html.
The first rule intercepts tcp packets (-p tcp) on ports 80 and 443 (HTTP and HTTPS; --dport 80 and --dport 443) and sends it to BurpSuite (--to-destination burpip:burp_http_port and --to-destination burpip:burp_https_port).
$ iptables -t nat -A PREROUTING -i br0 -p tcp --dport 80 -j DNAT --to-destination burpip:burp_http_port
$ iptables -t nat -A PREROUTING -i br0 -p tcp --dport 443 -j DNAT --to-destination burpip:burp_https_port
The second rule ensures that the reply gets sent back through the Kali Linux machine, instead of directly to the client that is being monitored (important!). The rule uses masquerade as the Kali Linux machine receives a dynamic IP address.
$ iptables -t nat -A POSTROUTING -o eth0 -s 172.16.0.0/12 -d burpip -j MASQUERADE
The third, potentially unnecessary, rule ensures that the Kali router forwards the appropriate packets to the machine running BurpSuite. Appropriate packets are HTTP (-p tcp --dport burp_http_port) and HTTPS packets (-p tcp --dport burp_https_port) originating from the monitor network (-s 172.16.0.0/12) on the bridge interface (-i br0) with as destination BurpSuite (-d burpip) running on a machine in the real network (-o eth0).
$ iptables -A FORWARD -s 172.16.0.0/12 -d burpip -i br0 -o eth0 -p tcp --dport burp_http_port -j ACCEPT
$ iptables -A FORWARD -s 172.16.0.0/12 -d burpip -i br0 -o eth0 -p tcp --dport burp_https_port -j ACCEPT
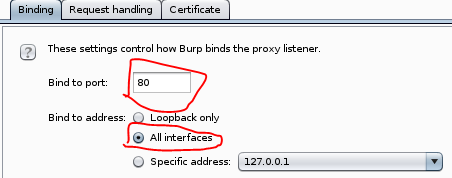
We then configure BurpSuite as a transparent proxy on the machine (burpip) and ports (burp_http_port and burp_https_port) referred to in the iptables rules above. We start BurpSuite, go to the Proxy tab, click Options, and click Add.

For HTTP traffic, we bind BurpSuite to port 80 (i.e. burp_http_port in our iptables rules) on all interfaces.
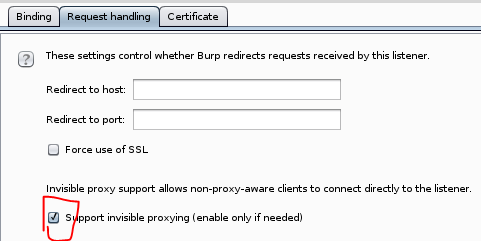
We go to the request handling tab and enable support for invisible proxying. This is necessary, as the clients are unaware of BurpSuite’s existence.
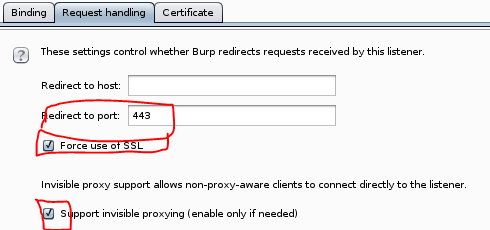
For HTTPS traffic, we bind BurpSuite to port 443 (i.e. burp_https_port in our iptables rules) on all interfaces.

We go to the request handling tab, redirect traffic to port 443, force use of SSL, and enable support for invisible proxying.
Automation
As we are lazy, we automate anything that we are going to do more than once. You can find the configuration files and the script on my github.
To get up and running do the following. - Obtain the code from github.
$ git clone https://github.com/koenbuyens/kalirouter.git
- install the necessary dependencies:
shell apt-get install dnsmasq hostapd bridge-utils - Plugin the USB interfaces and discover their names and MAC addresses by executing
iptables -a. - Tell the network-manager service that we will manage the interfaces ourselves by adding the adapters MAC addresses to the unmanaged-devices section of the
/etc/NetworkManager/NetworkManager.conffile and restart the networking service by executing/etc/init.d/networking restart.[keyfile] unmanaged-devices=mac:d8:eb:97:b6:ce:12;mac:56:6b:a2:90:c4:b9 - Modify the
hostapd.conffile and point it to the correct interface for wireless (defaultwlan0). - Modify the interface variables in the
monitor.shscript file to point to the correct interfaces.WIRELESS_MONITOR_INTERFACE, WIRED_MONITOR_INTERFACE, INTERNET_INTERFACEpoint to the wireless USB adapter, the wired USB adapter, and Kali’s VMWare interface respectively. Default iswlan0,eth1, andeth0. - Modify the proxy variables in the
monitor.shscript file to point to the IP address and port BurpSuite is running on.PROXYBOX,PROXYBOX_HTTP_PORT, andPROXYBOX_HTTPS_PORTrefer to the IP address. HTTP port, and HTTPS port respectively. The defaults are 172.16.0.1, 80, and 443. Modify the IP address if it runs on a different machine (in my case192.168.1.192). - Execute the script
bash $ ./monitor.sh - Output is in the
dumps/output.pcapfile. You can stop monitoring by pressing Ctrl-C.
Intercepting Communication from Embedded Devices, Android Apps, and Windows Applications
After starting our monitor script, we can start monitoring the devices and applications that connect to our monitor network.
Embedded Device
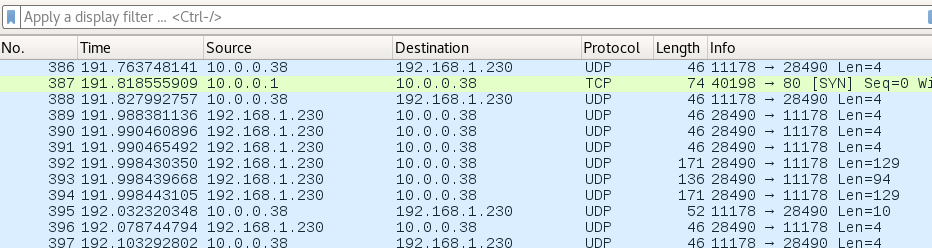
We connect an embedded device to our Monitor Network, either wirelessly or via Ethernet cable. We then let the device do its job. In the example below, our embedded device (10.0.0.38) communicates via UDP to a mobile app in our main home network (192.168.1.230). We could have connected both devices to our monitor network (10.0.0.0/8) to intercept all communication.
Mobile Applications
Before we can start monitoring mobile applications, we must add the certificate of BurpSuite to the trust store of the Mobile Operating System as most mobile applications (and thick clients) nowadays validate the certificate.
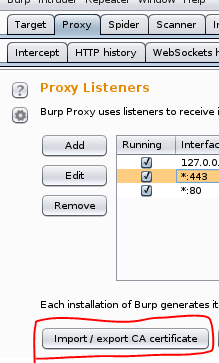
- We export BurpSuite’s certificate by clicking
Import/export CA certificatein theProxytab.
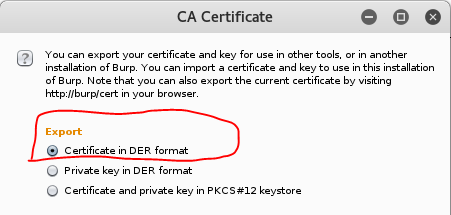
- We export the certificate as a DER file by selecting the
Certificate in DER formatoption.
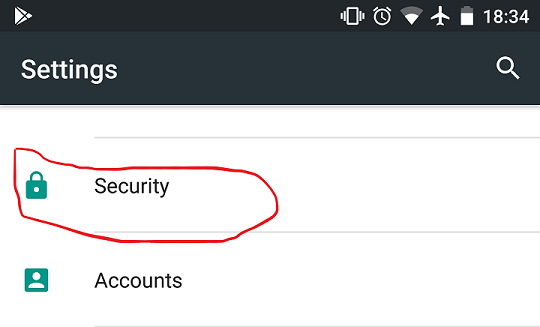
For Android apps, we add the certificate to the trust store of Android as follows.
1. We first go to the security settings.
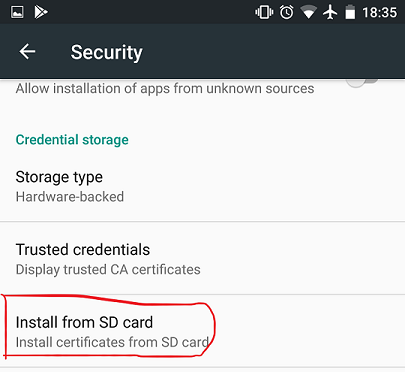
We then install a certificate from the SD card.
We select the certificate file.

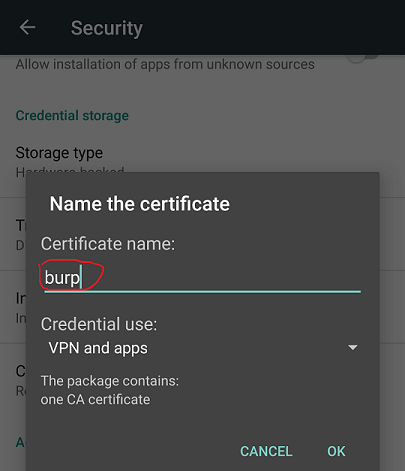
Finally, we give it a name.
After importing the certificate, we are ready to monitor an application.
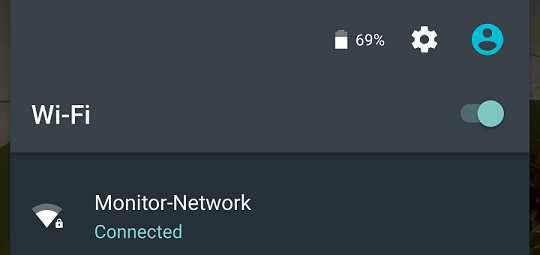
1. We connect the mobile device to our Monitor Network. We use the password that we had set-up in our hostapd configuration file.
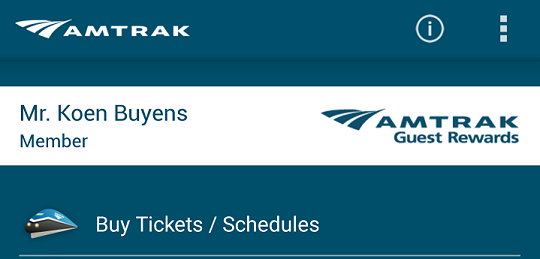
We then start the application that we want to monitor. The example below shows the Amtrak application.
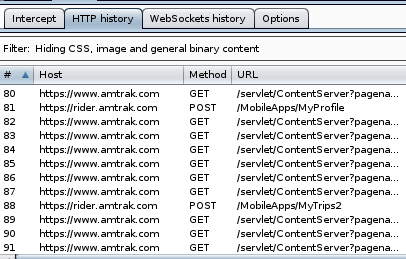
We observe that BurpSuite receives HTTPS traffic from the Android App.
We also observe that wireshark logs all traffic (in this case of the Facebook app).

Note: To monitor applications that implement HSTS, HPKP or Certificate Pinning, we would need to complete additional steps (that are outside of the scope of this article).
Windows Applications
We can also use this to monitor communication of Windows applications by connecting our Windows machine to the same network and adding BurpSuite’s certificate to the Windows trust store.
- We connect our Windows machine (via Ethernet) to our Monitor network.
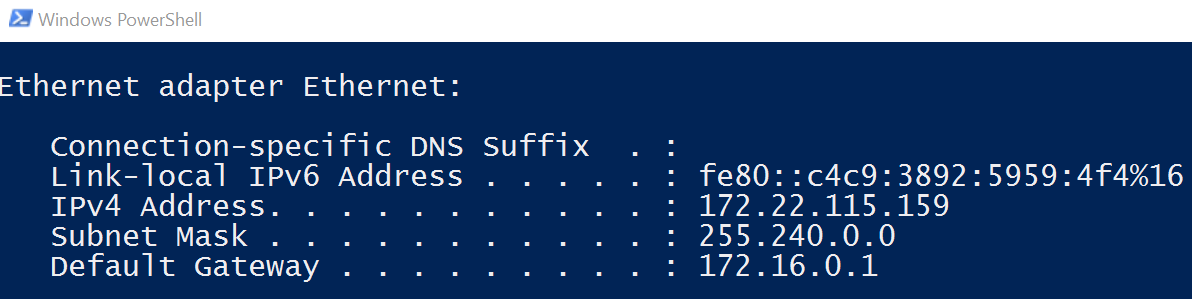
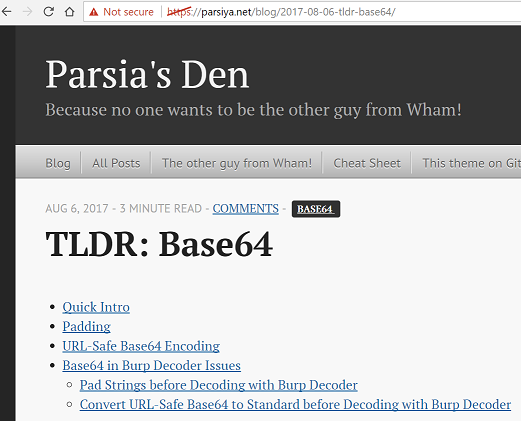
We follow the steps that Parsia outlined to import the certificate in the Windows Certificate store.
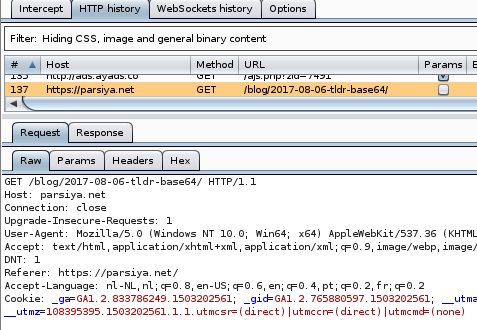
We start the application that we are interested in, in this case just our browser.
Observe that both BurpSuite and Wireshark receive the traffic.

A Raspberry Pi Kali Router
As we wanted a portable solution, we applied the above set-up on a Raspberry Pi. You can download a Raspberry Pi Kali Linux image with the set-up here. You most likely will need to apply the changes listed in the Automation Section, especially adding the MAC addresses of your cards to the Network Manager configuration file.
First, we download the latest Kali Linux image for the raspberry Pi at Offensive Security.
This image is most likely compressed with xz, as it ends with the xz file extension. We install the xz compression tool and use it to extract the image. If the Kali image is not compressed with xz (i.e. it has the img file extension, we can skip this step).
On MacOSX, this is as follows.
$ brew install xz
$ xz -d file-to-extract.xz
On Ubuntu, this is as follows.
$ apt-get install xz-utils
$ xz -d file-to-extract.xz
Second, flash the image to disk. We execute the df program twice to identify the disks attached to our system: first before inserting the SD card into the reader and then after inserting it into the reader.
$ df -h
The filesystem name of the SD card is the one that was not there before. On MacOSX, it looks like /dev/disk2s1. On Linux, it looks like /dev/sdb.
We unmount the partition so that we can write to it. On MacOSX, we unmount it with the diskutil command. As our flash card is the second disk (/dev/disk2...), we execute the following.
$ sudo diskutil unmount /dev/disk2
On Ubuntu, we unmount it with the umount command.
$ sudo umount /dev/sdb
We copy Kali to the SDCard with the dd command. Replace rdisk2 with the correct disk (i.e. /dev/sdb in my Kali machine) and replace LocationOfKaliImage with the path to your Kali Linux machine.
$ sudo dd bs=1m if=LocationOfKaliImage of=/dev/rdisk2
After completion, we insert the SD card into the Raspberry Pi, connect the Pi to a screen, attach a keyboard and mouse, and connect it to our network with an Ethernet cable. We plug in the power source to boot into Kali Linux for the first time and we login with the username “root” and the password "toor".
We expand Kali to take the complete SD card with the gparted application. We could also have used resize2fs.
$ apt-get install gparted
$ gparted
We update the software of the device by running the following commands:
$ apt-get update
$ apt-get upgrade
$ apt-get dist-upgrade
We update the root password by executing passwd.
$ passwd root
To communicate with our Raspberry Pi from our computer, we will use SSH. As it is not installed, we will install and enable it on boot as follows:
$ apt-get install openssh-server
$ update-rc.d -f ssh remove
$ update-rc.d -f ssh defaults
We change the default keys as follows:
$ cd /etc/ssh/
$ mkdir insecure_old
$ mv ssh_host* insecure_old
$ dpkg-reconfigure openssh-server
We change the sshd_config file to allow our root user to authenticate. (Note, this is not secure; it is better to create a regular user).
$ nano /etc/ssh/sshd_config
We change the following line.
PermitRootLogin without-password
to this line instead:
PermitRootLogin yes
We save our changes and restart the openssh-server.
$ service ssh restart
$ update-rc.d -f ssh enable 2 3 4 5
We want to install net-tools so that we are able to use ifconfig.
$ apt-get install net-tools
We then check out our scripts on the raspberry Pi, connect our USB adapters, follow the instructions in the Automation section (use wlan1 instead of wlan0), and are ready to go.
$ git clone https://github.com/koenbuyens/kalirouter.git
Conclusion
We transformed Kali into an intercepting router so that we can easily intercept communication between multiple devices.
References
The following links helped me creating a wired/wireless router in Kali Linux. - https://www.psattack.com/articles/20160410/setting-up-a-wireless-access-point-in-kali/ - https://cybergibbons.com/security-2/quick-and-easy-fake-wifi-access-point-in-kali/ - https://ubuntuforums.org/showthread.php?t=716192 - https://help.ubuntu.com/community/NetworkConnectionBridge - https://wiki.archlinux.org/index.php/Internet_sharing#Configuration - https://wiki.archlinux.org/index.php/software_access_point#Bridge_setup - https://wiki.debian.org/BridgeNetworkConnections#Manual_bridge_setup - https://help.ubuntu.com/lts/serverguide/network-configuration.html